.png?lang=en-US&ext=.png)
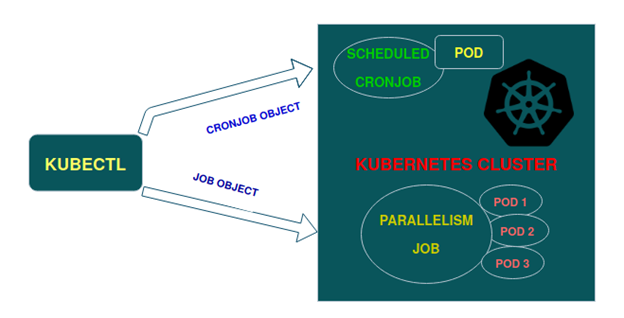
In this guide , Lets see how to run Cron Job in Kubernetes Cluster in a Scheduled and Parallel manner.
.png)
What Exactly Is A Cron Job?
For background, a cron job is any task that repeats on a schedule. You would see some cron job functionality in Linux and most related operating systems. A standard use case for cron jobs is to automatically execute necessary tasks repeatedly.
For example:
- Backing up files or directories
- Cleaning disk space
- Creating metrics or reports
However, cron jobs run on a schedule. With a standard notation, we can describe a broad range of schedules:
- Every night at 10:00 PM
- The first day of every month at 6:00 AM
- Every day at 8:00 AM and 6:00 PM
- Every Tuesday at 7:00 PM
A Job will create a pod / pods which will make sure the pods are deleted after the completion of the job
Deleting the Job will also delete the pod created for it.
In case of node failure or manual deletion of a Job, The Job will be rescheduled. Job ensures successful completion by its Pod.
PREREQUISITES
- Kubectl should be installed on the local machine to communicate with the kubernetes cluster
- Minikube or the Kubernetes cluster running on any cloud types will work for this tutorial.
Types Of Kubernetes Cronjob
.png)
1. SCHEDULERS (CRONJOB)
Its like scheduling tasks in crontab in Linux.
2. RUN TO COMPLETION
It runs the Job in parallel by creating one or more pods for the successful completion.Installing KUBECTL
1. Download kubectl using the below commands.
curl -o kubectl https://amazon-eks.s3.us-west-2.amazonaws.com/1.16.8/2020-04-16/bin/linux/amd64/kubectl
2. Add execute permission to the downloaded binary
chmod +x ./kubectl
3. Copy or Move it to the /usr/local/bin directory so that we don't have to type the full path of the kubectl.
4. Run the below command to check the version of kubectl installed
kubectl version
.png)
Creating A Kubernetes Cronjob
Lets deploy a job which can run for every 5 minutes and output as “Hello Kubernetes Cron Job”.
Kind : CronJob will be created for this.
1. Create a file named job.yaml and enter the below contents and then Save and close the file.
apiVersion: batch/v1
kind: CronJob
metadata:
name: kube-job
spec:
schedule: "*/5 * * * *"
jobTemplate:
spec:
template:
spec:
containers:
- name: hello
image: busybox
command : ["echo", "Hello Kubernetes Cron Job"]
restartPolicy: OnFailure

2. Run the below command to create a job
kubectl create -f job.yaml
3. It will give the below response.

4. Using the following command , Check the status of the Job
kubectl get cronjob -o wide

5. Monitor the job using the command.
kubectl get jobs --watch

6. The Job will create a Pod.
7. Run the below command to get the pod details.
kubectl get pods
8. Check the logs for a pod by executing the below command.
kubectl logs podname

As per the configured job.yaml file , The Job is successfully created and displays the required response.
Deleting Cron Job
1. First Get the name of the job using this command
kubectl get cronjob

2. We can delete the kubernetes Cron Job using the below command.
kubectl delete cronjob sample-job
3. The above command will delete all the job and the pods.
.png)
4. The additional parameters can be used while creating a Cton job as follows.
apiVersion: batch/v1beta1
kind: CronJob
metadata:
name: test-job
spec:
schedule: "*/5 * * * *"
concurrencyPolicy: Forbid
successfulJobsHistoryLimit: 5
failedJobsHistoryLimit: 5
jobTemplate:
spec:
template:
spec:
containers:
- name: hello
image: busybox
command : ["echo", "Hello Kubernetes Job"]
restartPolicy: OnFailure
5. Concurrency Policy – is responsible for parallel jobs.
6. The following concurrency policy can be used as follows ,
Allow - which by Default allow the The cron job to run concurrently
Forbid – Doesn’t allow concurrent jobs.
Replace – The old job will be replaced with the new job if the old job is not completed on time.
7. Job History Limits – such as successfulJobHistoryLimit =3 and failedJobsHistoryLimit=1 are optional fields.
8. It refers how many successful and failed job history can be present on the cluster
9. Set the limit to 0 , There won't be any job history
Running Multiple Job Pods In Parallel
When a Job is deployed , It will create multiple pods and run the jobs in parallel.
1. We will create a file named multiple-jobs.yaml and add the below config.
apiVersion: batch/v1
kind: Job
metadata:
generateName: kube-jobs-
name: kube-parallel-job
labels:
jobgroup: kubecron-group
spec:
completions: 3
parallelism: 2
template:
metadata:
name: kube-parallel-job
labels:
jobgroup: kubecron-group
spec:
containers:
- name: busybox
image: busybox
command: ["echo" , "kubernetes jobs parallel"]
restartPolicy: OnFailure
.png)
2. Understanding the parameters used in multiple-jobs.yaml file.
3. Running multiple jobs with the same name will cause an error reporting that the job with the same name already exists.
4. To fix this issue , We should add the generateName field in the metadata section.
5. So when the Job is executed it will create the pods with prefix kube-jobs– and with numbers.
completions – the no. of pods that can be used for the successful completion.
restartPolicy – accepts always , Never , OnFailure.
6. As the jobs are intended to run pods till completion , We should use never and onFailure for restartPolicy.
7. Lets deploy the Cron job using the below command.
kubectl create -f multiple-jobs.yaml
.png)
8. Check the available jobs,
kubectl get jobs -o wide
.png)
9. Get the list of pods created by the Job,
kubectl get po
You will get the similar response.

10. You can check the logs for one of the pod using the below command
kubectl logs -f parallel-job-jbfpb

11. Execute the below command to delete the job
kubectl delete -f multiple-jobs.yaml

We have learned to how to run Cron Job in Kubernetes cluster in a Scheduled and Parallelistic way.
Wrapping Up
Cron jobs can help you repeatedly perform important system tasks. Here, in this article, we have shed light on how to use cron jobs inside a Kubernetes cluster. Initially, we saw the YAML needed to define a cron job and how to operate its lifecycle using the kubectl command. Ultimately, we looked at certain ways to describe their schedule and how to properly handle time zones.


.webp?lang=en-US&ext=.webp)

.webp?lang=en-US&ext=.webp)